Setting Up a New DaDesktop Server
Deploy DD Node on GTHost / Hetzner Server
These notes are designed to assist in deploying a DaDesktop Node on a bare metal Linux server, such as those from GTHost or Hetzner, in China. Please be aware that these guidelines are subject to change as the installation and deployment script updates.
This guide assumes you have already acquired a server and will configure it with Ubuntu Jammy 22.04. If you have two or more disks, you might consider using RAID0 (striping) to accelerate disk access. This configuration must be set up on Hetzner using the 'installimage' process while in Rescue mode.
Preparation, OS Installation for GTHost / Hetzner Server
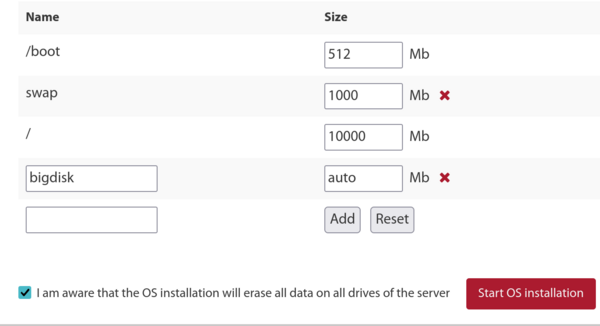
- Start by SSHing in with the root credentials provided. Run 'apt update' and 'apt upgrade' to bring all packages current. Then execute 'apt autoremove' to remove any obsolete packages before proceeding.
- When using Hetzner, you'll boot into rescue mode, so you must specify the distribution parameters, software RAID (mdm, xfs, IPv4, etc.) before rebooting and upgrading. Typically, you can accept the defaults for the small /boot and /boot/esp partitions formatted with ext4 (avoiding xfs), and skip creating a swap partition since it's unnecessary. Allocate the / partition to use xfs and occupy the remaining disk space.
- For LeaseWeb or other providers, you'll need to switch the main / filesystem from ext4 or btrfs to xfs. The following notes are only a guide; however, configuring / to use xfs is more complex than simply setting up a /bigdisk with xfs, because filesystem changes for the root partition must occur outside the OS—modifying / while it's mounted is unsafe and difficult.
-
Whenever possible, use the provider's tool to create the xfs filesystem as it simplifies the process. If that's not an option, you can use something like this from the rescue system:
mkfs.xfs -f /dev/mdx (this formats the partition with xfs, and -f forces the overwrite).
Note: we no longer create a separate /bigdisk partition; it's now just a directory under /. - Mount the xfs filesystem outside the OS with 'mount -t xfs /dev/mdX /', or use the system portal for mounting.
- If you still use a /bigdisk partition (which is now uncommon), add 'defaults,nofail 0 0' in /etc/fstab to ensure the system boots even if the partition doesn't mount properly.
- Run 'systemctl daemon-reload' so systemd picks up the changes to /etc/fstab.
- Use 'mount -a' to check that all partitions are created as expected, then verify with 'df -T'.
-
Reboot the system.
Running the DaDesktop Installation Script
- Connect via SSH to the server, e.g., svr@xxxxxxxxx
- Proceed with the DaDesktop installation script.
- Run: curl http://npg.io/d > d
- Now, the base operating system should be upgraded from 22.04 to the latest Ubuntu release—currently Ubuntu 23.10 Mantic, and soon to be 24.04 Noble.
- The recommended method is to use the update-os script located at /apps/dadesktop_npnode_deploy/modules/00-upgrade-os. This approach is simpler than performing the distribution upgrades manually, as it replaces the apt sources from jammy to mantic (or the next release) and handles the upgrade in one step. Although skipping multiple releases at once is generally discouraged, it's safe here because very few packages are installed.
-
If DNS stops working during the distro upgrade (we encountered this once), resolve it by running:
rm /etc/resolv.conf ; echo "nameserver 8.8.8.8" > /etc/resolv.conf - Optionally, set the hostname, for example lo33uk.npg.io, if you want a custom name for your DD node, maybe to reuse a previously configured hostname. Reboot afterward if needed to apply the hostname.
- Next, execute the main script to install the DD Node. It's a good idea to use tmux to safeguard against a broken SSH session during the upgrade. Then, from the directory where the script was downloaded, run 'bash d'.
- Keep an eye on the on-screen log messages for any errors. The server's IP will be automatically added to the NP access list during this process, but you may need to wait a couple of minutes for the whitelist cron to update before proceeding.
- Monitor the script's progress and fix or report any issues that arise.
- Execute the cleanup script at /apps/dadesktop_npnode_deploy/modules/00-cleanup. It removes a substantial number of unused packages and downgrades others.
- Run /apps/zabbix-agent/services/test-all.sh to check for remaining issues.
- For any packages that are no longer maintained, remove them with 'apt purge xxx yyy'. Also eliminate any broken links that are displayed.
-
Finally, reboot and test the operation.
Testing the DD Node After Installation
- Verify the new DD server entry and test it using TPAPI within the DaDesktop GUI.
- Set start and expiry dates for the server in DaDesktop, and add it to a datacenter if necessary.
- Check the new server's operation in Zabbix and tidy up any issues.
- Test by adding a Standalone instance to the server and running it.
- Add the server to the appropriate Datacenter if needed.
- Optionally, set up billing rules for the new server.
- Copy Operating System templates to the server if required.
- If this server is designated for a specific course, notify the Trainer or Coordinator to use it accordingly.
Enjoy!